Features
Sensor that diagnoses its own state. Featuring a self-monitoring function!
Self-monitoring function released by using the digital displacement sensor communication unit SC-HG1 in combination with digital displacement sensor HG-S series and HG-T series.>>HG-S / HG-T self-monitoring function>>Communication Unit for Digital Displacement Sensors SC-HG1
SENSOR HEAD
Slim & light body
Box type with an ultra-slim 11 mm 0.433 in width. Furthermore, the unit weighs only approx. 80 g. (Note 1)Note 1: Values on the 10 mm 0.394 in type (HG-S1010□ / HG-S1110□)
Plain bearings with 2-point support structure
A new structure supports the spindle with upper and lower plain bearings to significantly increase rigidity. Unlike ball bearings, these bearings efficiently disperse lateral loads on the spindle, significantly reducing the risk of breakage.
Bending-resistant cable
A bending-resistant cable provides peace of mind even when the sensor is installed on a movable tool.
Hot-swappable
Change of sensor head without turning off the power supply
The sensor head can be changed safely without turning off the controller. This reduces the man-hours required for the change of line setup for processing of different workpieces, thus achieving a significant reduction of setup change time.
Metal guide whirl-stop structure
Spindle whirl-stop is accomplished by means of a metal guide requiring a several μm level assembly precision. Unlike a plastic guide, the risk of measurement error and glass scale breakage caused by deformation, wear, and other deterioration is significantly reduced.
No “value skipping” or “unset zero point”
Displacement is measured by reading a glass scale with a different slit pattern at each reading position using a highresolution sensor. This eliminates "value skipping" even when measuring at high speed, and there is no concern of "unset zero point".
Tip deviation amount of 35 μm 1.378 mil or less (typical value) (Note 2)
(Note 2) :
Value calculated from the clearance of the upper and lower plain bearings.
[40 μm 1.574 mil or less (typical value) on the HG-S1032 / HG-S1050 (Note 2)]Tip deviation that reduces measurement precision is also minimized. Deviation of the measurement point is held to a minimum.
Class-top accuracy
* As of January 2021, in-company survey.
Resistance to shock and vibration
* In the case of the 10 mm 0.394 in type / 32 mm 1.260 in typeAs of January 2021, in-company survey.
[Resistant to upward thrust impact]Spindle stopper installed
Even if unexpected upward thrust occurs, the lower turning off the power supply part of the spindle blocks the impact. Damage to the internal structure, including the glass scale, is minimized.
Regular type
Impressive durability
Resistance to lateral load
Original test was conducted to ensure durability against vertical sliding and lateral load that sensors are often subjected to in actual operations. There is a reason why you can use this product with peace of mind for a long time.
■Durability to withstand more than 200 million vertical sliding operations (typical value) (Note 3)
Note 3: Value on the HG-S1010 / HG‑S1110.
■Withstands more than 100 million sliding operations under application of lateral load (typical value) (Note 4)
Example of a lateral load occurring in the workplace
(Note 4) :
Value on the HG-S1010 / HG-S1110.
(Note 5) :
Button-type probe for evaluation purposes was installed on the test sample for the lateral load resistance test.
* In the case of the HG-S1010 / HG-S1110 As of January 2021, in-company survey.
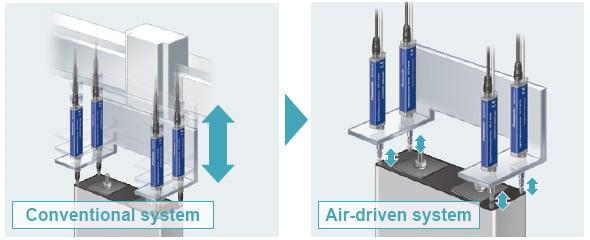
Air-driven type
Air-driven type sensor heads simplify equipment mechanisms.

There is no need to design a mechanism for moving the sensor head. This eliminates the design cost and manhours and improves equipment accuracy.Reduces installation spaces
Supply and release of air moves the spindle up and down.
Eliminates the need for designing and installing a mechanism to move the sensor head up and down.
Compatible with low measuring force
Removal of the seal cap from the main unit allows measurement with low measuring force. The low probe contact force minimizes the possibility of workpiece damage.
High durability against lateral sliding load
Number of lateral sliding cycles: 10,000,000 or more (typical value) (under continuous testing) The robust sensor head helps reduce damage caused by workpiece setup mistakes.■Our original durability test against lateral sliding load
CONTROLLER
Versatile and Easy-to-Use Controller
The controller features the industry's first* dual display and offers versatile functions and excellent ease of use. It allows simple and reliable operation of the advanced measurement function in a diversity of applications.* As a sensor product using optical absolute method, as of September 2015 (according to in-company survey)
Dual display for added indication flexibility (equipped with NAVI function)
The 2-line digital display simultaneously shows head measurement (measured value) and judgment value (calculated value).
All-direction LCD
The high-contrast LCD provides sharp and clear indications and wide viewing angle.
Equipped with intuitive circle meter
Values between allowable maximum and minimum values are indicated in green. Values outside of the allowable range are indicated in orange. This provides at-a-glance understanding of the margin to the tolerance limits.
Anytime selection of function to copy
The selective copy function significantly reduces the man-hours required for initial setting and maintenance.
High-speed response of 3 ms in combination with any sensor head
Provided with maintenance mode useful on production floor
The following data is saved in the memory. The stored data can be used effectively for on-site analysis.• Maximum peak value during operation• Number of times maximum stroke was exceeded• Cumulative spindle moving distance (m)
Alarm setting for notification of upward thrust
Alarm can be set to notify the user when upward thrust (stroke) exceeds the value set by the user.
Easy-to-understand 2-line digital display
The 2-line digital display simultaneously shows sensor head measurement and judgment value.
Easy tolerance setting
Simple 1-point teaching
Align with master workpiece and press ENTER key for easy tolerance setting.
No need for trigger input
Equipped with self-trigger hold function
Easy setting of time length from measurement start to measurement stabilization. Minimizes measurement fluctuation due to the vibration caused by stopping of spindle rotation.
(1) Static width setting
Stability range above the ST level can be set as desired.Set the range where measurements are considered to be stable.
(2) Delay timer setting
Desired delay time after measurement exceeding the ST level can be set.Set the time required for stabilization of measurement.
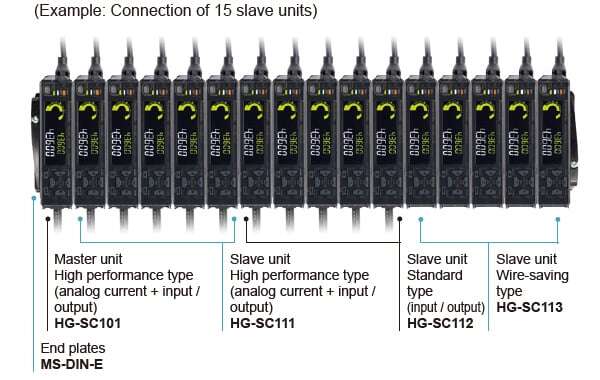
Lateral connection of slave units for added operational ease
Connection of up to 15 slaves units
One master unit can be connected with up to 15 slave units in any order. This allows easy multi-point calculations.* When a digital displacement sensor communication unit is connected, a maximum of 14 slave units can be connected per master unit.
Controller variations
■Master unit (1 model)・High performance type (analog current + input / output)■Slave unit (3 models)・High performance type (analog current + input / output)・Standard type (input / output)・Wire-saving type

* End plates (optional) must be mounted on both sides of the controller after the connection of slave units.


